


Crafting Corner: Wall (He)art
Are your dorm room walls looking a little bland? Do you have an awkward wall that is completely blank? Looking for an inexpensive and easy wall décor project? Then this DIY is for you! Learn how to make Photograph Heart Wall Art that’s perfect for any dorm room
Materials:
20-35 Photographs (the number depends on how big you want you heart to be), scissors, ruler, pen, tape or wall putty
Directions:
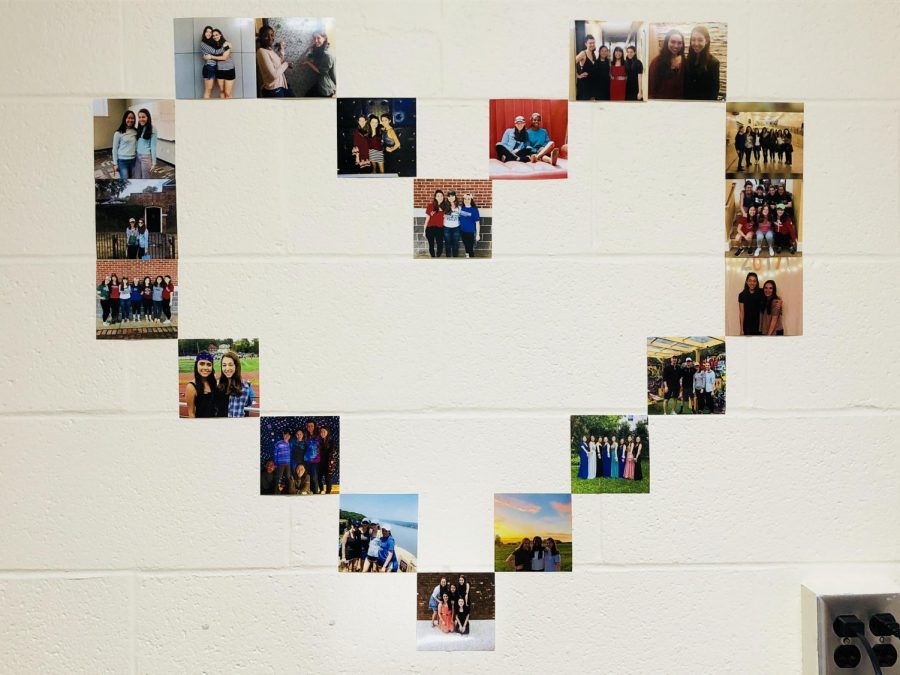
I love this project not only because the final product looks innovative and much cooler than just putting your photos up in a straight line, but also because it is super simple to create. I started with 20 standard sized (4 x 6) photographs. This project was inspired by A Beautiful Mess’s “Instagram Picture Heart Display.” Originally, I printed 35 photos, following their instructions. I quickly realized this was way too many for the size of my wall. When I tested out the design on my floor to see what it would look like, my heart was massive! However, another bonus to this DIY is its flexibility. I was easily able to adjust the dimensions, as I will explain how to below.
First, I took my 4 x 6 photographs and cut them into 4 x 4 squares. This is where the pen, ruler and scissors come in. It’s okay if not every photo is cut perfectly to size, as long as the general square shape is achieved.
Then, I started to lay out my design. I tried to balance my subject matter as much as possible throughout the heart. For example, I would not put three group photos in a row or directly next to each other, but this is a choice that is totally up to you!
When assembling the heart, I began at the bottom tip. For clarity, I will call this the “base” photograph. I simply put this single square where I wanted the center of my heart to be. Once I had decided where on the wall I wanted the base to be, I used wall putty to secure it (although regular tape should also do the trick). Now it’s time to start assembling the heart!
Next, select your next two photos. One will go on the left and the other on the right of your base photograph. They should touch or tap the top left and top right corner of your base picture. A way to get the placement just right is to start with these three photos in a line and then slide the two added ones so that they touch the bases top corners. The same technique will be used to create the V, diagonal lines of the heart. Simply keep adding photographs with this “tip, tap” technique. For my display, I had four photos make up my diagonal line. However, you can add or subtract the amount you put in based on how big or small you want your design. Pro tip: if you live in the Quads and have cinder block walls, the lines can help you make sure you are placing your photos straight (this is possibly one of the only times the cinder blocks can be considered a luxury).
Once you are happy with the size of your diagonal, it’s time to start stacking photos to make the heart’s vertical straight side. I used three photos for this portion, simply putting them directly above each other, rather than sliding the picture to the left or right corners.
To assemble the top, flat portion, place your photos directly beside each other. From your previous vertical portion, for this section, the first photograph should be tapping the corners above, like we did before. Then, simply add a photograph horizontally so that it sits beside your last one, creating a line. This portion should be relatively small, I only used two photos. That’s because we’re almost finished!
To finish off your display, repeat the “base” photograph step with your final three photos. This will create your final tip to close off your heart. If your numbers were accurately chosen, your final picture should be directly above, parallel to your base photograph.
Not too hard, right? It is the perfect piece to create an accent wall with minimal supplies and effort. Another way to make this project your own is to fill your heart fully with photos. You can also use these techniques to create a different shape with your photographs, the possibilities are endless!